| Menus & Inventory -> Sales
Items |
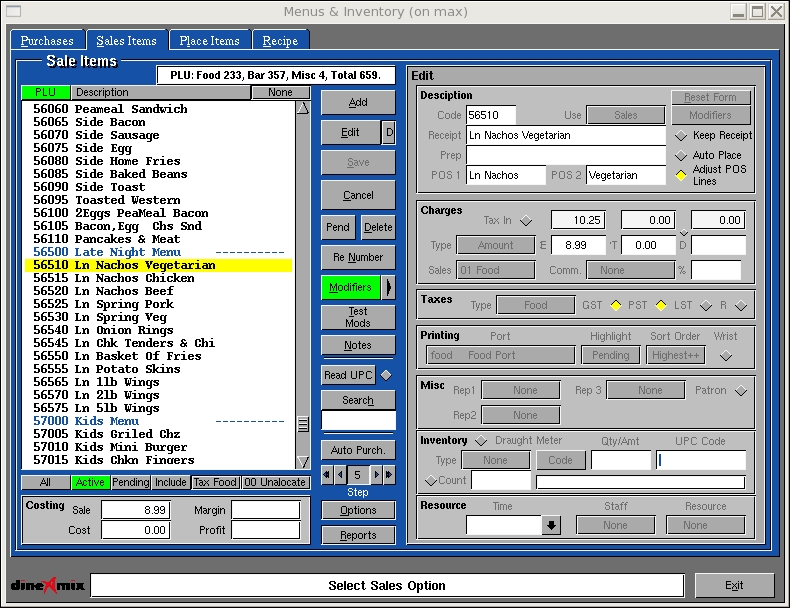
We are finally ready to create a list of Sale items. This list
is often called the Skew and represents all of the items sold from the
store. As in previous screens, a list of items is presented on the
left side of the screen and attributes for an item is on the right. In
addition a sale item can have a list of modifiers that can modify basic
item information. Modifiers will be described at the end of this section.
Add: Used to add a new Sale code. Press
the "Add" button and enter a number from 1 to 99999 in the number
field. Enter or Select options from the following fields;
Description
-
Use: A item can be used for a number of purposes. Here are the available
uses;
-
Pending: Used to indicate the sale code is not currently available
for Sale.
-
Sales: Used to indicate the item is a regular sale item and is available
for display at the POS.
-
Assembly: This Sale type is not available at the POS. Rather it
can be included by other Sale items to affect inventory values. An example
of a Assembly would be Pizza sauce. The store may purchase ingredients
to manufacture Pizza sauce. A portion of this sauce will be used in Sale
items. To track inventory values a Pizza sale item would include a portion
of this assembly in its recipe so the appropriate amount of the assembly
recipe items will be removed from inventory when the sale item is sold.
-
Title: Used only for descriptive purposes and has no Sales ramifications.
-
Include: Modifiers are often duplicated among many Sale items. In
order to reduce the number of times similar modifiers have to be associated
to a sale item the "Include type" is used. This item will not appear
on the POS. Most of the information following the include has no meaning
to the system. Rather it is the modifiers associated with this items that
is of importance. Create a list of modifiers for this item. When you want
these modifiers to appear in an sales item modifier list, simply refer
to this include number in a modifier list of the sale item and all of this
items modifiers will appear for that sale item.
-
Reset Form: The system never resets common information when you
save an item. This is done since a great deal of the information from the
previous item will be applicable to the next. In order to set all form
values to a pre determined set of defaults, press this button.
-
Receipt: This field is used to describe the sale item. This description
will appear on sale receipts and in the absence of a Kitchen description
will also be used for preparation tickets. If the item is a new item the
system will attempt to break up the description into 2 fields and enter
them in the POS1/2 description fields. i.e.: "Fish & Chips" becomes
"Fish &" "Chips".
-
Kitchen: Used to over ride the Receipt field for printing preparation
tickets.
-
POS 1/2: Used to describe the item at the POS. The POS can display
2 lines, one below the other.
Taxes
-
Type: Select the tax type that best describes the sale item. When
selecting a tax type the system will turn on or off the applicable tax
rates as they were defined when the taxes were configured. (see Configuration->General->Taxes)
The available types are;
-
Food/Retail:
-
Bar/Services:
-
Miscellaneous:
-
T1/T2/T3/R: These buttons represent the tax setup defined in taxes.
To alter the taxation of an item select or deselect any or all of the tax
setup. The "R" type is reserved for future use.
Charges
-
Type: There are a number of ways to describe to way an item will
be charged. They are as follows;
-
Amount: The POS will use one of the amounts from the E, T or D fields.
-
Variable: The POS will prompt the server to enter the value
of the sale item.
-
Quantity: The POS will prompt the server for the quantity of items
being sold.
-
Discount: This type is used to discount an order.
-
Additions: This type is used to add value to an order.
-
Certificate: Used to indicate this item is a certificate. A certificate
will be printed for this type.
-
Patrons Discount: Currently unsupported.
Note: For Discount/Addition the E field is
used to affect the way the value of this item is calculated. If the value
of this field is ZERO, the server will be prompted to enter an amount.
If the field starts with a "%" sign the user will be prompted to
enter a percentage which will be used to calculate a value based on the
guest charges and order charges. If the field starts with a "%"
sign
immediately proceeded by an amount then a fixed percentage will
be calculated for this item. If an amount is present in this field
this value will be used for this item.
-
E/T/D: This field represent the charge value WITHOUT TAXES
for the item. "E" stands for Dine charges, "T" for takeout charges and
"D" for Delivery charges. The value of an item will be based on the corresponding
charge. In the absence of a "T" or "D" value, the "E" value will be used.
-
Tax In: The tax in button affects the way you enter the values
for "E", "T" and "D" charges. With this button unchecked the values you
enter are assumed to have no taxes. For convenience you can activate this
button and the system will accept taxed values and convert them back to
their un taxed value based on the taxes applied to it.
-
Group: As described in (Configuration->General->Grouping) sale items
can be consolidated into groups for reporting purposes. Select a group
from the list for this item.
-
Comm: Commissions can be assigned to an item. Commissions are used
to calculate commission paid to a server for the sales of an item. Commission
can be a simple % rate of the value of the item or can refer to previously
defined Commission code. (See Configuration->General->Commsission) Enter
a value or select from a list commission codes.
Inventory
-
Type: For the purpose of affecting inventory values an item can
be one of the following types;
-
Purchase: This type refers to a Purchase code to determine the cost
of sales for this item. Select a Purchase code from the "Code" button.
You must also indicate the amount of the purchase code being consumed by
this sale. Enter this quantity in the Qty/Amt field.
-
Assembly: This type is the same as a purchase type but instead of
referring to a Purchase code. The code refers to an Assembly code that
refers to purchase codes. Again you must enter the quantity of the assembly
being consumed by this sales. Enter the quantity in the Qty/Amt field.
-
Amount: This type has no inventory ramification but is used to indicate
the cost of a sale item for the purpose of costing. Enter the values in
the Qty/Amt field.
-
None: Has no inventory effect.
-
Code: Select a purchase or Assembly code.
-
Qty/Amt: Enter the quantity of an above code being costumed by this
sale or a fixed value for this sale for costing purposes.
-
UPC Code: Enter the "Unified Product Code" for this item.
-
Warn: Enter the minimum number of inventory units that will trigger
a warning when inventory levels reach or are less than this value.
This feature is used to inform servers of inventory shortages. This option
is active if set in the Configuration->General->General->Inventory
area.
Printing
-
Port: If they item needs to be printed for the purpose of preparation
then select the print port from the previously defined list.
-
Highlight: It this item is to be highlighted on the preparation
ticket the select this option.
-
Sort Order: To indicate the priority that this item will appear
on a preparation ticket select a priority level from Highest to lowest
from the list. If no order is chosen then the items will appear on the
preparation ticket in the order they were chosen at the POS.
Assembly
-
Measure: Indicates the Unit measure for this assembly.
-
Base: Indicates the unit base being described by the Quantity field.
-
Quantity: The amount of product produced by this assembly.
Resource
-
Time: The amount of time used to provide this service. This item
is only used for Service sale items.
-
Staff: The Staff member type used to provide this service.
-
Resource: The facilities used by this service.
Save: Used to record your changes from an "Add"
or Edit" mode.
Edit: Used to change Sales information.
Select a Sales item from the list and press "Edit". Change the information
as required and press Save to record your changes.
Modifiers: Used to access the modifier list
for the current sales code.
Test Modifiers: Used to display the modifier
list as it would appear at the POS.
Delete: Used to remove a Sale code from
the list. Select a Sales item from the list and press "Delete". You will
be prompted to confirm your choice.
Rename: Used to renumber a Sales code. Select
a Sales code from the list and press "Rename". Enter the new Sales
code in the number field and press RETURN to record the change.
Cancel: Used to deselect a Sales code from
the list or to exit the "Add" or "Edit" mode without recording any changes.
Move: At the time of writing this option
was not available.
Search: Used to find an item in the lists.
Enter some information in the line below the search button and press Enter.
The system will look through the list and highlight the firsts occurrence
of you search. Press "Search" again to keep searching through the list
or "Cancel" to stop.
Read UPC: UPC is an acronym for "Unified
Product Code". These codes are use to uniquely identify a products manufacturer
and type. This number is often accompanied with a bar code. Press this
button to enter the Read UPC mode which allows these numbers to be entered
for a Sales item using a bar code scanner. Highlight the Sales code
you want to reference and Scan the the bar code from the product label.
The number will be recorded to the currently selected sales item. To
exit this mode, simply press the "Read UPC" button again.
Test Data: Since sales items and their modifiers
can be complicated to setup, we provide a secondary set of data that can
be used to experiment, without affecting your final list of Sales Items.
Press this button to enter the Test Data mode. Any changes you make from
this point on will not affect your stores sales list. The system provides
an initial list of test data. This list is provided to demonstrate the
features available from modifiers. To exit this mode simply press the test
data button again.
Step: When creating a new list of sales
items the system will assume a new Sale code number t o be either the current
number plus the value of the step number or the last number in the list
plus the step number. You can change this value by pressing the arrows
to the left or right of the step number.
Options: This button presents a list of
operations that can be performed on the Sales list. They are as follows;
-
Title Case: Used to fix the Sale code title and POS description
to Title case print.
-
Upper Case: Used to fix the Sale code title and POS description
to Upper case print.
-
Lower Case: Used to fix the Sale code title and POS description
to Lower case print.
-
Assignment: Used to assign values to many Sale codes.
-
Merge: Use to import sale codes from another company or master list.
-
Re Number: Used to re organize sale code numbering.
Reports: This option presents a list of reports
that can be printed.
Costing: This area prints costing information
for the currently selected item.
Modifiers
Modifiers are used to;
-
Recipe: The amount of purchase code used in the preparation of a
sale item.
-
Instruction: Print on preparation tickets to better instruct preparation
staff.
-
Modifiers: Like instructions but can also modify inventory values
and charge rates.
-
Title: Used to more properly present instructions and modifiers
at the POS.
-
Include: Used to include a set of modifiers from a previously defined
Include sales code.
- Like Item: Used
to refer to the Sales code pricing. The Value variable is a factor of
the sales code orginal price. i.e To make a modifier that adds 25% of
the originating sales code value enter 0.25 in the value field of ths
like item.

Modifiers are one of the premier features of the Dine-Amix POS system.
The following describes the steps necessary to configure modifiers. See
the Tutorial at the end of this section for examples of their use.
Before we describe the attributes or values of modifiers, we will first
discuss manipulating the modifiers list.
Modifier List
-
Main Screen: Used to select or deselect an item in the list.
-
Up Arrow: Moves a selected item up in the list.
-
Down Arrow: Moves a selected item down in the list.
-
Add: Adds a modifiers to the end of the list. Fill in the modifier
values and press "Add".
-
Insert: Insert a modifiers above the selected item. Fill in the
modifier values and press "Insert" then select an item to insert the modifier
before. Press to "Insert" button again to stop the insert mode.
-
Replace: Replace the information from a currently selected modifier
with the contents from the modifier values.
-
Copy: Copy the currently selected modifiers of group of modifiers
into memory.
-
Cut: Remove the currently selected modifiers from the list.
-
Select All: Select all of the modifiers in the list.
-
Deselect: De select all of the modifiers in the list.
-
Test: Test the appearance and options of the modifiers as seen at
the POS.
Note: This options saves your information before presenting
the modifiers to you. The reload option will now return the values used
in the test instead of the values used when you first entered the Modifier
screen.
-
Reload: Load the original set of modifiers from the system. This
has the effect of erasing any changes you may have made during the current
session.
-
Save: Save your changes to the system.
Modifiers
Modifiers have a number of attributes that affect their operation view
and function. They are as follows;
Modifier Description
-
Type: Modifiers can have a number of different functions. They are
as follows;
-
Recipe: This type is used to indicate the modifier form part of
the Sales items recipe and will affect inventory and costing.
-
Service: Used to indicate this modifier is part of a list of services
to be provided by the sale item.
-
Title: Used to add a line or separate a head a group of items for
the purpose of clarity at the POS.
-
Instruction: Used to print on preparation tickets to better instruct
preparation staff.
-
Modifier: Like instructions but can also modify inventory
values, costing and charge rates.
-
Next Pop Up: Indicates the Stop of this group of modifiers for presentation
purposes. Modifier that follow this type will appear in a new pop up list.
Any list of modifiers can have up to 4 Pop Up lists.
-
Include: Used to include a set of modifiers from a previously defined
Include sales code.
-
Description: Used to describe the moodier. This description appears
at the POS.
-
Value: This field is used to added or deducted a dollar value from
the the sales item when this modifier is selected.
Modifier Inventory
-
Recipe: Indicates whether this modifier forms part of the Sale item
recipe. This is used for costing purposes and inventory control.
-
Type: This indicates whether an item affects inventory or costing.
The following options are supported;
-
Purchase: If this type is selected the system will deduct the amount
specified in the value filed from the purchase code. Press the "Code" button
to select the appropriate purchase code.
-
Assembly: If this type is selected the system will deduct the amount
specified in the value filed from the Assembly code. Press the "Code" button
to select the appropriate Assembly code.
-
Amount: This will only include an dollar value for this modifier.
This is for costing purposes only and has no inventory ramifications.
-
None: Does not affect costing or inventory.
-
Code: Select a Purchase or Assembly code.
-
Value: The quantity of Purchase or Assembly code being consumed
by the sale item. Or the amount affecting costing.
Modifier Display
-
Show: If this option is selected the modifier will appear at the
POS. If not the modifier will be hidden. This is typical for recipe items.
-
Level: Any modifier can refer to another group of modifiers. This
can continue for 3 levels. The first level is 0. A modifier with a higher
level number will begin a new group of modifiers. The level available are
from 0 to 2.
-
Group: Items can logically be grouped to affect the manner in which
they are selected. 10 groups are available ranging in name from A-J.
-
Group Type: This determines how an item can be selected within a
group. The following types are supported;
-
Single: Only one item can be selected within a group. The previously
selected item will be deselected.
-
Multiple: Any number of items with a group can be selected.
-
Fixed 1-9: A fixed number ot items must be selected. The number
if from 1 to 9.
-
Select: Determines the state of the modifier when it first appears.
The following options are supported;
-
Yes: The item is initially selected when the list of modifiers appear.
-
No: The Item is no selected when the list of modifiers appear.
-
Force: The item will always be selected and can not be changed.
-
Pop Up: This determines how the item is presented. The following
options ae supported.
-
Pop Up: This option will show all of the modifiers in a group at
once.
-
Scrolled: This option will show only one line on the screen for
the group. Touching the item present the next item in the group and start
at the beginning when the last item is reached.
-
Quantity: This type will present a Keypad requesting a quantity
to be entered for the item.
Modifier Printing
-
Printing: This option determines how and when an item will be printed
on a preparation ticket. The following options are supported;
-
Yes: Always print this item.
-
No: Never Print this item.
-
Change: Print this item only if its select state has changes from
its original state.
-
Select: Print this item when selected.