| Introduction -> POS Installation
Guide for Red Hat 7.1 - 7.2 - 7.3 |
Installing Linux.
Insert Red Hat CD # 1 into cdrom drive and start your
system. The CD is boot able and will begin the installation automatically.
When you see the boot prompt, press ENTER to begin installation.
Step 1 - "Mouse Probe"
-
If your mouse is not detected select OK from the "Mouse Not
detected" panel.
-
Select a mouse from the "Mouse Selection" panel and press
OK.
-
Select the port your mouse is connected to from the "Device"
panel and press OK.
Step 2 - "Language Selection"
-
Select a language from the "Language Selection" panel and
press NEXT.
Step 3 - "Keyboard Configuration"
-
Select a keyboard Model, Layout and Enable dead keys from
the "Keyboard Configuration" panel and press NEXT.
Step 4 - "Mouse Configuration"
-
Confirm your mouse and port choices from the "Mouse Configuration"
panel and press NEXT.
Step 5 - "Introduction"
-
Read the Red Hat introduction and press NEXT.
Step 6 - "Install Type"
-
Select the Install/Workstation installation from the "Install
Type" panel and press NEXT.
Step 7 - "Disk Partitioning"
-
Select "Automatically partition and REMOVE DATA" choice from
the "Disk Partitioning" panel and press NEXT.
Step 8 - "Network Configuration"
-
De-Select the DHCP option.
-
Select the Activate at boot option.
-
Enter "IP Address:" 192.168.0.254
-
Enter "Net mask:" 255.255.255.0
-
Enter "Network:" 192.168.0.0"
-
Enter "Broadcast:" 192.168.0.255"
-
Enter "Host name:" sales
-
Enter "Gateway:" 192.168.0.254"
-
Erase any entries in the Lines "Primary DNS", "Secondary
DNS", Ternary DNS"
-
and press NEXT
Step 9 - "Firewall Configuration"
-
Select "No firewall" from the "Firewall Configuration panel
and press NEXT.
Step 10 - "Language Selection"
-
Select a language from the "Language Selection" panel
and press NEXT.
Step 11 - "Time Zone Selection"
-
Select the time zone you work in from the "Time Zone Selection"
panel and press next.
Step 12 - "Account Configuration"
-
Enter the "root" password. Choose a password that you will
remember. This is the Master system administrators password and cannot
be recovered. Place a copy of this password somewhere safe. You will need
to install your software package.
-
Enter the "root" password confirmation.
-
and press NEXT. Note: No other accounts are required.
Step 13 - "Package Group Selection"
-
Select only the "GNOME" option from the "package Group Selection"
panel and press NEXT.
Step 14 - "X Configuration"
-
Select your Video card from the "X Configuration " panel
and press NEXT.
Step 15 - "Monitor Configuration"
-
Select your Monitor from the "Monitor Configuration"
panel and press NEXT.
Step 16 - "Customize Graphics Configuration"
-
Select the "Color Depth" and "Screen Resolution" from the
"Customize Graphics Configuration" panel.
-
Select "Graphical" logon from the the "Customize Graphics
Configuration" panel and press NEXT.
Step 17 - "About to Install"
-
Press NEXT to start installation.
Step 18 - "Installing Packages"
-
Insert the Red Hat CD #2 when prompted and press OK.
Step 19 - "Boot disk Creation"
-
Insert a blank floppy disk into your disk drive and press
NEXT.
-
When the "Boot disk" has been made, remove the disk from
its drive
-
Select "Skip Boot disk Creation" and press NEXT.
Step 20 - "Installation Complete"
-
Press "Exit" to complete your installation.
-
Remove the CD from the cdrom drive and wait for the system
to reboot.
Installing DineAmix
Step 1 - "Logon as root"
-
At the logon prompt enter the name "root" and press ENTER.
-
At the password prompt enter the password you chose during
the installation and press ENTER.
Step 2 - "Clear Dialogues"
-
In the desktop close any warning dialogue boxes and select
to not view then again.
Step 3 - "Install DineAmix"
-
Insert the "DineAmix" CD into your cdrom drive and wait for
the "Auto run Dialogue" to appear. Select "Yes" to start the DineAmix installation
program.

-
If the Auto run dialogue (above) does not appear follow the
steps below;
-
Start a Unix shell by pressing the "TV Screen with Foot"
button on your desktop guide bar The "Unix shell" is a program that will
accepts typed commands from the keyboard.
-
at the prompt "#" type "mount /dev/cdrom /mnt/cdrom" followed
by the ENTER key.
Note 7.2 Users: If the mount command fails enter
the following command at the "#" prompt. "depmod -ae". This is used to
properly configure some hardware setups to read the CD-ROM drive.
-
at the prompt "#" type "cd /mnt/cdrom" followed by the ENTER
key.
-
at the prompt "#" type "./install"
followed by the ENTER key to start the installation program.
Step 5 - "Install Security Kernel"
-
The first time a message "No Security Kernel Installed" will
Appear. Press START to install the security kernel.
-
After the kernel has bee installed the message "Your System
Needs to re restarted" .Attach the DineAmix security dongle to your computers
parallel port. The dongle is a hardware device that has been pre programed
with information about your installation. Press RESTART to restart your
computer. Remove the CD while your system is restarting.
Step 6 - "Installing DineAmix"
-
Logon as the root user as described above.
-
Insert the DineAmix CD into the cdrom drive and wait for
the "Auto run" dialogue to appear.
-
Press "Yes" to start the installation program.
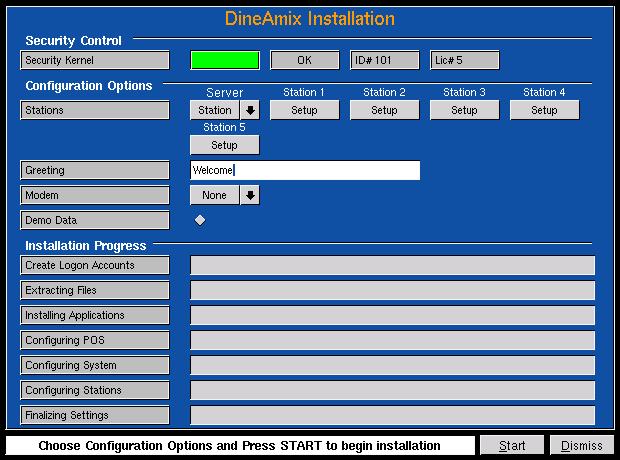
Step 7 - "Configuring you Installation"
-
From the Configuration Options panel choose the following;
-
If the Server (computer) will be used as a POS station choose
"Station"
in server box otherwise choose "Office".
-
Enter a "Greeting" message in the Greeting line. This
message will be displayed in the "Logon" dialogue.
-
If a "Modem" has been installed the select the modem
port it is attached to so the installation utility can configure it.
-
It you would like some Demonstration data installed check
the "Demo Data" button.
Step 8 - "Configuring Stations"

-
Each station must be configured to reflect the type of program
and equipment that will be attached to it. Answer the following questions;
-
Network MAC Address: Enter the MAC address of
the stations network card. This has no meaning for Server stations. If
you cannot locate this number on the card or in the vendors documentation
you can create a "Ether boot" diskette. Use the diskette to boot your computer.
The diskette will display the network cards MAC address. (see boot disk
Creation)
-
Usage: Select the program will be used at the station.
-
Touch Screen Model: Select the type of touch screen
being used at the station.
-
Touch Screen Size: Select the size of monitor for
the station.
-
Touch Screen Limits: Enter the Lower & Upper X/Y
values for the station touch screen. You can enter these values at a later
time while calibrating your screen. For now simply accept the values that
the program presents.
-
Attachments Keyboard: Indicate if a keyboard is present
at the station
-
Attachments Printer: Indicate if a printer is present
at the station.
-
Attachments Mouse Type: Select the type of mouse connected
to the station.
-
Ports Touch Screen: Select which port the Touch Screen
is attached to.
-
Ports Mouse: Select the port the Mouse is attached
to.
-
Ports Pole Display: Select the port the Display Pole
is attached to.
-
Press SAVE to record your changes. Press RESET to return
the original values and DISMISS to exit without saving your changes..
Step 9 - "Start Installation"
-
Press the START button to begin the installation.
-
When the installation is complete press the RESTART button
for the changes to take effect. Remove the CD while the system is
rebooting.
Step 10 - "Post Installation"
-
Three (3) Logons were created during the installation.
-
"postech" used for technical support.
-
"posadmin" used by the client to administer the POS.
-
"possales" use to start the POS application at the
server.
-
Each user has a password of "1pospass".
-
Logon as "postech". When the initial dialogue box appears
select "Don't Show me Again" and select Dismiss. An icon has been placed
on the desktop to allow you quick access to the Configuration and POS utilities.
The entire Red Hat suite of applications are available from this logon.
-
Logon as "posadmin". This logon takes you directly the POS
configuration utilities.
-
Logon as "possales". This logon takes you directly to the
POS program selected during the installation.
If you have any problems during the Installation or have other questions
please contact DineAmix at
1-888-411-6636